Installation instructions
In order to install the central web application, you have to:
- download and install the Java SDK 1.6 in your central server, which can have any O.S. Windows, Linux, Unix, MacOS X
- download and install Apache Tomcat; it is recommended to install Tomcat release 6 and to DO NOT install it in a path having spaces, as for "c:\Program files"
- download meaapp.war from this web site and copy it within the Apache Tomcat "webapps" sub-folder
After starting Tomcat, you can access the web application by typing an URL address on your browser such as this one:
http://yourhost:yourport/metaapp/
If you have not changed the default port of Tomcat, you can type: http://localhost:8080/metaapp
In case of problems, check your firewall settings: your firewall or antivirus could block the listening port used by Tomcat.
This web application contains a SQLite database into the webapps/metaapp/WEB-INF/classes folder: you can move this database and re-define the location in the file system for the files to end to the mobile devices through two optional parameters, defined in webapps/metaapp/WEB-INF/web.xml file. You can edit it with a text editor and add two parameters as reported in the example below. After that, please be sure of having repositioned .db file and/files to send and restart the Tomcat service.
<?xml version="1.0" encoding="UTF-8"?> |
Configuration instructions
Before running the app on the mobile phone, it is essential to correctly configure the central web application. The web GUI is very trivial: after logging for the first time, you will se the unique UI which composes this web application; it allows to define all the mandatory setting required by this system:
- username and password that will be required in order to access the central web application from next time
- the local path where the input CSV file will be checked for import
- the local path where an CSV file will be generated for export
- the local path where binary files will be checked
- number of hours to wait before re-checking for the availability of the files
- starting hour to schedule for files checking

A line in the CSV input file must have the following fields, separated by a ";":
- table name - one of the table names defined in a functionality
- field0 - data field
...
- field9- data field
- file1 - relative path, including file name, related to a binary file
- file2 - relative path, including file name, related to a binary file
- file3 - relative path, including file name, related to a binary file
- enabled - char Y/N indicating if the record mustbe considered valid or logically deleted
The format of the export file is exactly the same.
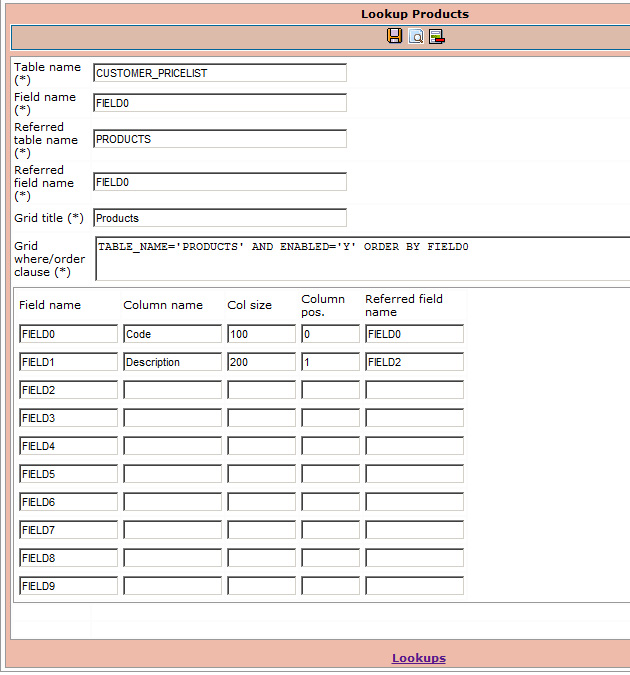
In order to use the mobile app, it is important to define: lookups, functions and users and user authorization.
A lookup is a special kind of input control composed of an input field and a selection button, showed in filter panels or detail panels, used to select a code from a list of codes, through a selection button.
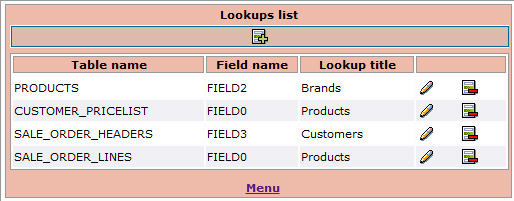
If the user already knows the code, it is possible to directly type the code in the lookup input field. Before creating functions, lookups should have been already defined. In order to define a lokup, a number of data must be specified:
- table name + field name - identify a specific lookup, starting from a function working on the table and field
- referred table + field name - a field included in the select clause of the SQL query of the lookup, that will be used to fill in the field name with the selected code;
- SQL query of the lookup - this query can refer in the where clause also values taken from the parent window, by specifying them as :FIELDNAME
- binded fields - list of fields to fill in with the fields specified in the select clause of the SQL query of the lookup
- lookup title - title to show in the flip window opened when the user press on the lookup button; this window will be automatically opened also when the code typed by the userin the lookup input field does not match a unique value: the window will show all the codes which start with the specified code;
- column names and sizes - used to show the column headers on top of the window and to specify the column sizes, expressed in pixels
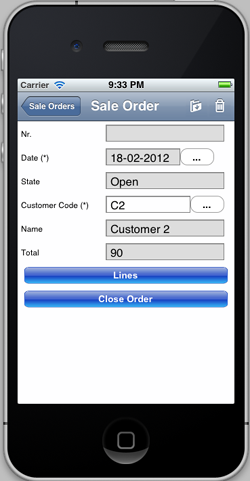
A functionality is related to a filter panel (optional), a grid and a detail panel (optional). As alternative, it is possible to define a functionality as a command to execute when pressing a command button in the detail panel; in this case a sequence of SQL instructions will be executed. All these settings can be defined through the functions web page.
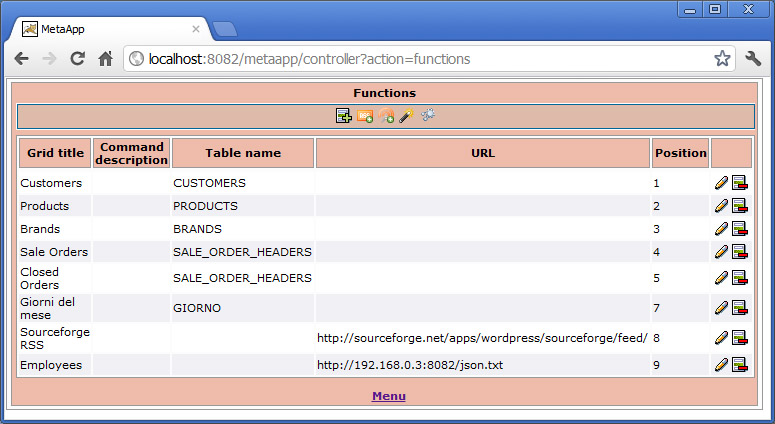
This list only reports the functionalities accessible starting from the app menu. All the others functions are available as command buttons or children grids within a detail panel. In this web page is possible to create new first level functions (i.e. accessible from the app menu) or edit/delete existing first level functions. The "Function" web page allows to define a function and it can be used in 5 ways: (i) by defining the grid content, (ii) by defining the grid + detail content or (iii) by defining a command button, in case of a function which is a child of another detail pane or (iv) by defining the grid + readonly detail content fed by an RSS service or (v) by defining the grid + readonly detail content fee by a Restful web service having a JSON/XML response.
In order to define a functionality, a few information must be defined:
- position of the window in the main menu or in the list of detail buttons
- flags used to define if central data updates must be sent to the mobile device and if data created in the mobile app must be sent to the central database
- optional icon name - a relative path including the file name, to use to show an icon in the app menu; the corresponding image file must be provided along with the other binary files loaded by the scheduled job
In order to define a functionality which is a grid, a few additional information must be defined:
- grid title
- grid SQL to execute - in case of a grid which is a child window of a detail panel, the where clause can refer values of the parent detail record, through the binding notation :FIELDNAME
- row height - this optional setting can be defined in case of a grid having images to show; the default value is 40 pixels
- loadAll - flag used to define if all data mustbe loaded in the grid or only a block of data (data paging)
- column names and sizes
- filter fields - a list of fields included in the select clause, used to build a filter panel having such a set of fields
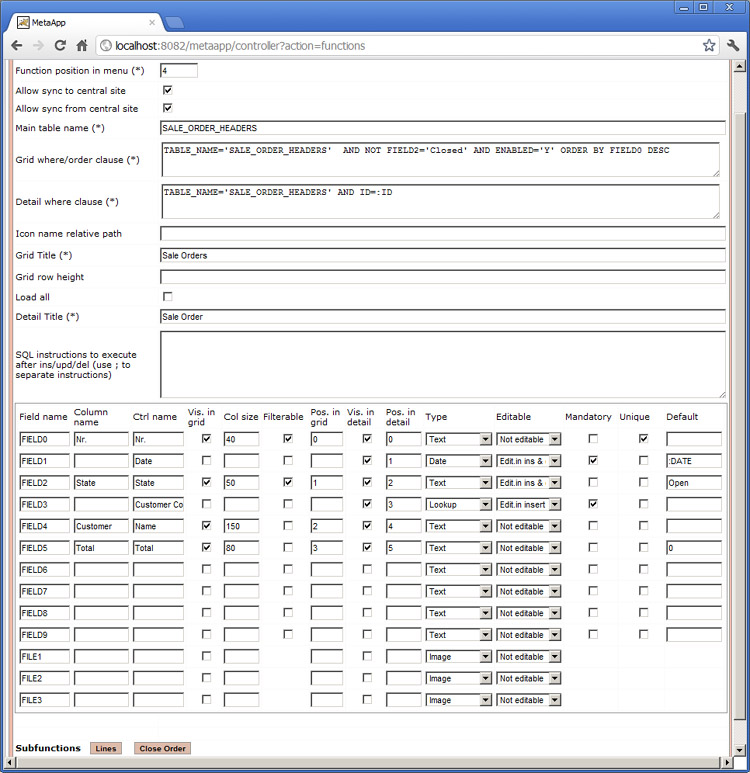
In order to define a functionality which is composed of a grid and a detail, a few additional information must be defined, other than the ones already reported in the previous sections:
- detail title
- detail SQL to execute - the where clause can refer values of the parent grid record, through the binding notation :FIELDNAME
- labels linked to the detail input controls defined through the select clause of the detail SQL; if the select clause includes the ID field, this will notbe showed
- detail controls type - allowed values are: T text, A textarea, N number, D data, L lookup, R readonly, U uppercase+trim+text, I image, B button used to show a binary file (e.g. a PDF)
- mandatory fields - a list of fields included in the select clause, which must be filled before saving data
- unique fields - fields which identity the record (optional); this setting is not compulsory because each record is internally identified by an ID field, automatically generated by the mobile app when creating the record; records created in different mobile devices are unique because the progressive generated for the ID field is unique worldwide, since each device has a different starting value and the same step; e.g. mobile1 has starting value 2 and step 1000, so progressives are 2, 1002, 2002, 3002, etc, whereas mobile2 may have initial value 3 and step 1000 and therefore progressives 3, 1003, 2003, 3003, etc; initial values are defined when creating a user in the central web application
- defaults- this optional list of couples FIELDNAME=VALUE can be used to preset values for detail controls or hidden fields, when creating a new record; think about the bind existing between a record and its parent, in the case of a master-detail relationship
- SQL optional instructions to execute after an insert/update/delete operation; it can be useful to execute additional SQL operations, for example to update ancestor records: think about the correct total amount for a header document, to recalculate after inserting/updating/deleting of a document line
- main table name - used to create ad hoc SQL instructions for insert/update and delete operations
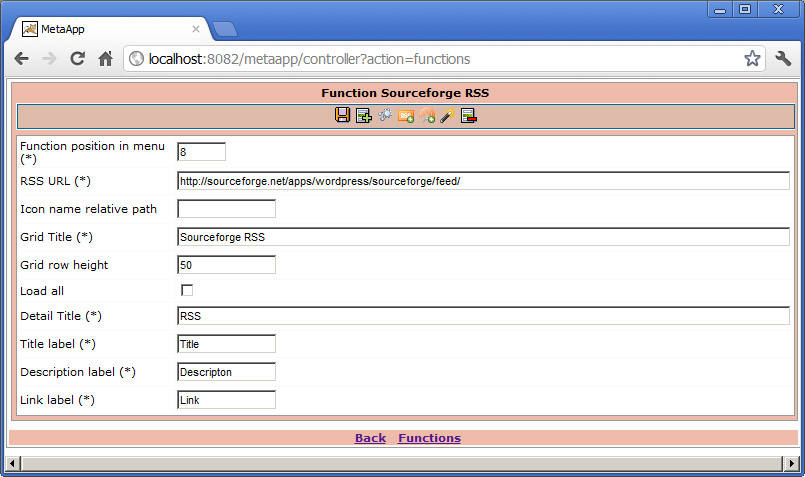
In order to define a functionality which is composed of a grid and a detail fed by an RSS service, a few additional information must be defined, other than the ones already reported in the previous sections:
- RSS URL
- labels for title, description and link to show in grid and detail; an RSS is always composed of these 3 data
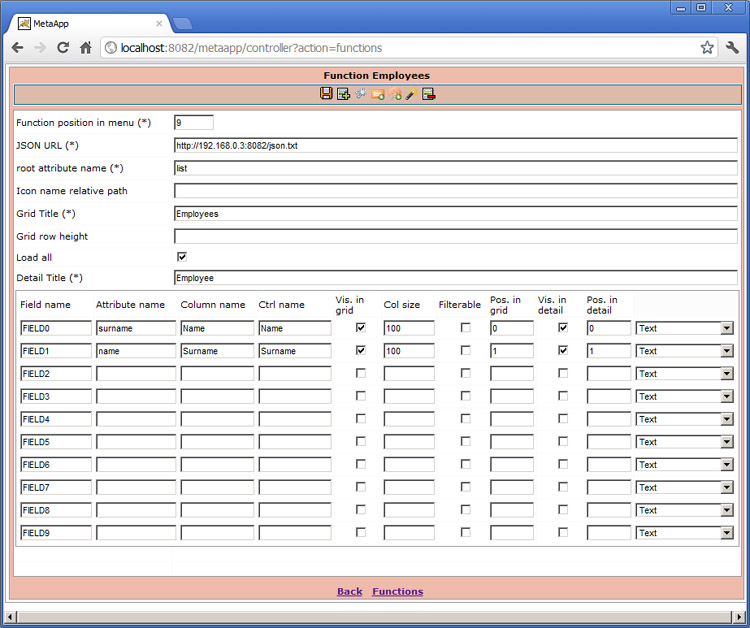
In order to define a functionality which is composed of a grid and a detail fed by a Restful web service, a few additional information must be defined, other than the ones already reported in the previous sections; these additional information vary according to the fact the the WS returns a JSON or XML response format; in the first case, attributes must be read, the latter tags must be read:
- JSON/XML web service URL
- root tag or root attribute in the WS response, used which has a list of data to read as children nodes
- attribute names/tag names to read, for each children node
- it is possible to define which type the readonly data must have, for example a text or a text area or a link.
In order to define a functionality which is composed of a command button to show atthe bottom of a detail panel, a few additional information must be defined, other than the ones already reported in the first section:
- command title
- command SQL to execute - the where clause can refer values of the parent grid record, through the binding notation :FIELDNAME

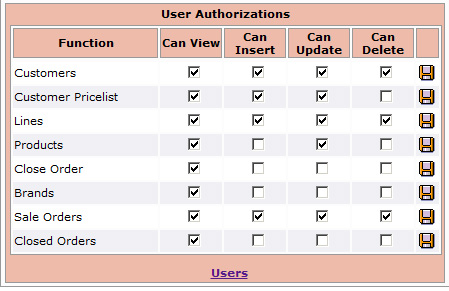
Grids are always read only, whereas detail panels can be either readonly or editable. It is possible to specify per user/functionality combination whether a detail is readonly or editable in insert and/or in edit or if it is possible to delete a record or even if a function mustbe hidden in the app menu. All these settings can be defined though the users and user authorizations web pages.
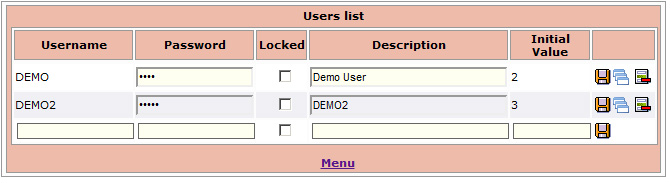
In the users list it is possible to insert/update or delete users. For each use the initial progressive value must be specified; the initial value should be different for every user: in this way there will not be conflicts due to records having the same record identifier (ID field). In the "User Authorizations" web page it is possible to define, for each functionality, whether it can be showed for the current user; in case the user had the grant to show the function, the can insert/can update/can delete flags can be used.
Mobile App
You can install this app in an iPhone/iPad device or in an Android based mobile phone.
The first time you run the mobile app, a setting panel is showed: you have to specify the central URL the app will use to check for updates and the username and password you have previously define in the web application.
After that, the app will download the database and its data as well as the files linked to the data. Every time you launch the app, you can check for updates and download them (data and files to receive from central site and data to send to the central site).
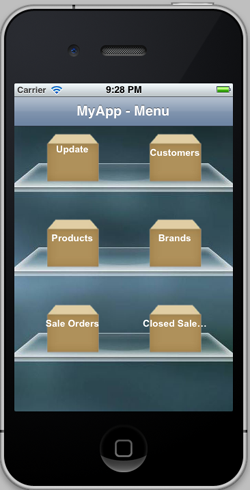
The GUI is composed of the app menu; starting fro the menu, the user can navigate through the functionalities using the top navigation bar (grid -> filter/detail -> children functionalities).
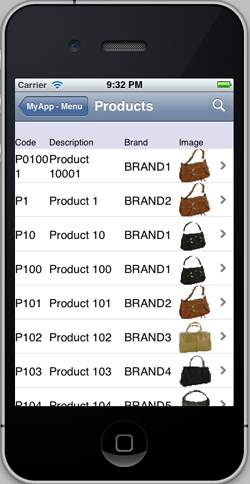
Supported graphics components are: grid with paging, text/date/numeric fields, code selector, buttons, images and viewing of other binary files (e.g. PDF files).
Online demo
You can try the mobile app by connecting it to a demo central site environment: simply use the following settings when starting the mobile app for the first time:
central site URL: http://go.to/metaapp
username: demo
password: demo